Thursday, December 18, 2014

How to change server level collation for a SQL Server Instance

Note: Do not make any changes in production without proper testing in Dev/Test environment.

The server collation acts as the default collation for all system databases that are installed with the instance of SQL Server, and also any newly created user databases.

To change the default SQL Server collation you can simply rebuild the system databases. When you rebuild the master, the model, msdb and tempdb system database are actually dropped and recreated in their original location. If a new collation is specified in the rebuild statement the system databases are rebuilt using that collation setting. Any user modifications to these databases will be lost, so it is important to backup any of this information you wish to retain. For example, you may have user-defined objects in the master database, scheduled jobs in msdb, or changes to the default database settings in the model database. 

Steps to change server level collation of a given SQL Server Instance
Step 1:
First check the existing SQL Server collation setting of your instance. Run the command below to get the collation value of your SQL Server instance.

SELECT SERVERPROPERTY(N'Collation')  --SQL_Latin1_General_CP1_CI_AI

Step 2:
Make note of all server level settings before rebuilding the system databases to ensure that you can restore the system databases to their current settings.

SELECT * FROM sys.configurations;
-- OR
EXEC SP_CONFIGURE


Step 3:
Create and prepare all scripts related to jobs, maintenance plans, logins and their access levels.

Step 4:
Detach or take backup of all user databases before rebuilding your system databases. If you leave databases attached they will be detached and will be found in the database folder.

Step 5:
Change directory to the Installation Media location.

C:\Program Files (x86)\Microsoft SQL Server\110\Setup Bootstrap\SQLServer2012

Run the following syntax from the folder location.Replace the Instance name, accounts, Strong password & collation name accordingly.

C:\Program Files (x86)\Microsoft SQL Server\110\Setup Bootstrap\SQLServer2012>Setup /QUIET /ACTION=REBUILDDATABASE /INSTANCENAME=instancename /SQLSYSADMINACCOUNTS= sql /admin SAPWD= sapassword /SQLCOLLATION=SQL_Latin1_General_CP1_CI_AS


Once the rebuild operation is complete, check the server collation to verify whether this change is successful or not.
SELECT SERVERPROPERTY(N'Collation')  
--SQL_Latin1_General_CP1_CI_AS

Monday, June 23, 2014

Shrink Database fails with Error: Backup, file manipulation operations

Sometimes you may get below error while trying to shrink their databases manually or using SSMS.

Executing the query "DBCC SHRINKDATABASE(N'DemoDate', 10, TR..." failed with the following error: "Backup, file manipulation operations (such as ALTER DATABASE ADD FILE) and encryption changes on a database must be serialized.

Probable reason for above error:

While shrink Database backup is running. You cannot do below operation while doing backup:

• The file truncation phase of shrink database or shrink file.

• File management operations such as the ALTER DATABASE statement with either ADD FILE or REMOVE FILE clauses.

Please note that if backup is running and one of the above operations is attempted, then operation fails immediately. When user is trying to add or remove a file and if backups is started then backup will wait for a timeout period, then fail.

If user is trying to shrink database or file while a backup is running, the shrink stops without truncating the file. If backup started after shrink database operation then backup waits for shrink operation to complete.


Step 1 : Execute the below T-sql

SELECT session_id, Text FROM sys.dm_exec_requests cross apply sys.dm_exec_sql_text(sql_handle)

If it shows any back up device on the query result, Kill the session ID

Step 2 : If the session ID is 54 then , use the below statement

KILL 54

Now start the backup.

If still its not working, Close all SQL SERVER instance then open a SQL SERVER and do the BACKUP.

Wednesday, May 14, 2014

SQL – Query to find data,log,Total Size and other Useful information of all databases – SQL 2000/2005/2008/R2


USE MASTER
Go


SELECT @@SERVERNAME Servername,
CONVERT(VARCHAR(25), DB.name) AS dbName,
CONVERT(VARCHAR(10), DATABASEPROPERTYEX(name, ‘status’)) AS [Status],
(SELECT COUNT(1) FROM sysaltfiles WHERE DB_NAME(dbid) = DB.name AND groupid !=0 ) AS DataFiles,
(SELECT SUM((size*8)/1024) FROM sysaltfiles WHERE DB_NAME(dbid) = DB.name AND groupid!=0) AS [Data MB],
(SELECT COUNT(1) FROM sysaltfiles WHERE DB_NAME(dbid) = DB.name AND groupid=0) AS LogFiles,
(SELECT SUM((size*8)/1024) FROM sysaltfiles WHERE DB_NAME(dbid) = DB.name AND groupid=0) AS [Log MB],
(SELECT SUM((size*8)/1024) FROM sysaltfiles WHERE DB_NAME(dbid) = DB.name AND groupid!=0)+(SELECT SUM((size*8)/1024) FROM sysaltfiles WHERE DB_NAME(dbid) = DB.name AND groupid=0) TotalSizeMB,
convert(sysname,DatabasePropertyEx(name,’Updateability’)) Updateability,
convert(sysname,DatabasePropertyEx(name,’UserAccess’)) UserAccess ,
convert(sysname,DatabasePropertyEx(name,’Recovery’)) RecoveryModel ,
convert(sysname,DatabasePropertyEx(name,’Version’)) Version ,
CASE cmptlevel
WHEN 60 THEN ’60 (SQL Server 6.0)’
WHEN 65 THEN ’65 (SQL Server 6.5)’
WHEN 70 THEN ’70 (SQL Server 7.0)’
WHEN 80 THEN ’80 (SQL Server 2000)’
WHEN 90 THEN ’90 (SQL Server 2005)’
WHEN 100 THEN ’100 (SQL Server 2008)’
END AS [compatibility level],
CONVERT(VARCHAR(20), crdate, 103) + ‘ ‘ + CONVERT(VARCHAR(20), crdate, 108) AS [Creation date],
ISNULL((SELECT TOP 1
CASE TYPE WHEN ‘D’ THEN ‘Full’ WHEN ‘I’ THEN ‘Differential’ WHEN ‘L’ THEN ‘Transaction log’ END + ‘ – ‘ +
LTRIM(ISNULL(STR(ABS(DATEDIFF(DAY, GETDATE(),Backup_finish_date))) + ‘ days ago’, ‘NEVER’)) + ‘ – ‘ +
CONVERT(VARCHAR(20), backup_start_date, 103) + ‘ ‘ + CONVERT(VARCHAR(20), backup_start_date, 108) + ‘ – ‘ +
CONVERT(VARCHAR(20), backup_finish_date, 103) + ‘ ‘ + CONVERT(VARCHAR(20), backup_finish_date, 108) +
‘ (‘ + CAST(DATEDIFF(second, BK.backup_start_date,
BK.backup_finish_date) AS VARCHAR(4)) + ‘ ‘+ ‘seconds)’
FROM msdb.dbo.backupset BK WHERE BK.database_name = DB.name ORDER BY backup_set_id DESC),’-’) AS [Last backup]
FROM sysdatabases DB
ORDER BY dbName, [Last backup] DESC, NAME

Monday, April 21, 2014

Updatable Clustered ColumnStore Indexes in SQL Server 2014

Updatable Clustered ColumnStore Index that is introduced with SQL Server 2014. Before we go down to the details, I want to give you a brief overview about their first appearance in SQL Server 2012, and their limitations.

ColumnStore Indexes in SQL Server 2012:

The introduction of ColumnStore Indexes in SQL Server 2012 was one of the hottest new features (besides AlwaysOn). If chosen right, they can make an impressive performance improvement for Data Warehousing workloads. Unfortunately, they had 2 big limitations:
  • There was only the support for Non-Clustered ColumnStore Indexes
  • As soon as you had created a ColumnStore Index on a table, the underlying table was read only, and no changes to the data were allowed anymore
Both limitations were a huge bummer for some customers. Imagine you had a table with 300 GB of traditional row store data. With a ColumnStore Index it’s possible to compress that data down to a size of 30 GB. But SQL Server 2012 only allowed a Non-Clustered ColumnStore Index, means you had to store your data twice: one in the traditional row store format, and once in the new ColumnStore format. That’s a huge waste of storage, because your queries will (hopefully) only use your Non-Clustered ColumnStore Index.
And as soon as you had created your Non-Clustered ColumnStore Index, you were not allowed to change the underlying table data anymore – your table was just read only! Of course, there were some workarounds for this problem, like Partition Switching, but you still needed to implement that on your own…

ColumnStore Indexes in SQL Server 2014:

Things are changing now with SQL Server 2014, because Microsoft has resolved the above mentioned issues – with some magic and illusion: SQL Server 2014 provides you an Updatable Clustered ColumnStore Index! Let’s have a more detailed look on how this magic and illusion happens internally in SQL Server.
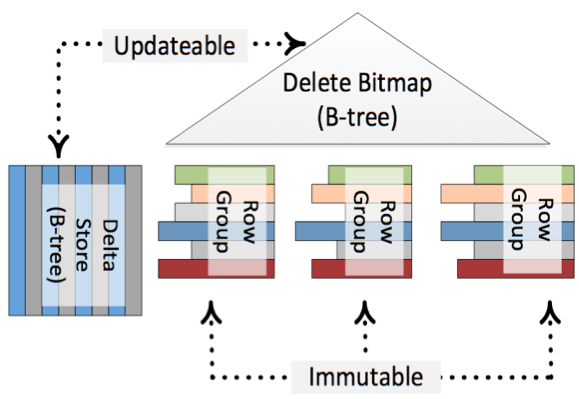
The first most important fact is that an underlying direct update of a ColumnStore Index is not possible! It would be too time consuming to do the complete decompress and compress on the fly during your INSERT, UPDATE, and DELETE transactions. Therefore SQL Server 2014 uses help from some magic: Delta Stores and Delete Bitmaps. Let’s have a more detailed look on both concepts.
Every time when you run an INSERT statement, the new record isn’t directly inserted into the ColumnStore Index – the record is inserted into a Delta Store. The Delta Store itself is nothing else than a traditional B-Tree structure with all its pro’s and con’s. When you afterwards read from the ColumnStore Index, SQL Server returns you the data from the compressed ColumnStore Index AND also from the Delta Store.
When you run an DELETE statement, again nothing happens in the compressed ColumnStore Index. The only thing that happens is that the record is deleted logically through a Delete Bitmap. Every record in the ColumnStore Index has a corresponding bit in that Delete Bitmap. When you again read your ColumnStore Index, SQL Server just discards the rows that are marked as deleted in the Delete Bitmap.
And running an UPDATE statement just means inserting the new version into the Delta Store, and marking the old version as deleted in the Delete Bitmap. Easy, isn’t it? The following picture (source http://research.microsoft.com/apps/pubs/default.aspx?id=193599) shows this concept in more details.


Because of the Delta Stores and the Delete Bitmap it seems that your ColumnStore Index is updatable, but in reality it is just immutable. There is also a background process called the Tuple Mover, which runs regularly and finally pushes your changes asynchronously into the compressed ColumnStore Index.

 In addition you can also finally define a ColumnStore Index in SQL Server 2014 as Clustered. This means that you don’t need to have your data in the traditional row store format anymore. Just create your table and create a Clustered ColumnStore Index on it. You can some with this approach huge space savings in your storage, because everything is now compressed. When you work in more details with the concepts of relational databases, Clustered always means Sorted. But with a Clustered ColumnStore Index this statement is not true: when you create a Clustered ColumnStore Index, there is NO sorting order in your data! Just be aware of this tiny little fact.

Buffer Pool Extensions in SQL Server 2014

Buffer Pool Extensions are introduced with SQL Server 2014. As you know, the Buffer Pool is one of the main memory consumers in SQL Server. When you read data from your storage, the data is cached in the Buffer Pool. SQL Server caches Execution Plans in the Plan Cache, which is also part of the Buffer Pool. The more physical memory you have, the larger your Buffer Pool will be (configured through the Max Server Memory setting).

A lot of SQL Server customers are dealing with the problem that physical memory is restricted in database servers: all memory slots are already occupied, so how do you want to add additional memory to the physical server? Of course, you can migrate to a larger server, but that’s another story… The solution to this specific problem is the introduction of Buffer Pool Extensions in SQL Server 2014. With the help of the Buffer Pool Extensions SQL Server introduces another layer in the memory hierarchy. Let’s have a look on the following picture:


As you can see you have on the top the Buffer Pool itself, which is very fast (regarding latency times), and at the bottom you can see our traditional storage, which is mainly slow. And the Buffer Pool Extensions are just settled down between of both – between the traditional Buffer Pool and our storage. The Buffer Pool Extensions itself are consisting of one simple file (the so-called Extension File) that should be stored on very fast storage – like a SSD drive. The Extension File is mainly the same as the page file in the Windows OS. Instead of adding additional physical memory to your database server, you just configure an Extension File on a SSD drive.

Before talking about the configuration and the concrete use of the Buffer Pool Extensions, I want to talk a little bit about the architecture and design behind the Buffer Pool Extensions. The traditional Buffer Pool of SQL Server always differentiates between clean and dirty pages. A clean page is a page which has the same content as the page in the storage. A dirty page is changed in memory, but hasn’t yet written to the storage. Around every minute the so-called CHECKPOINT process writes dirty pages out to the storage, means that our dirty page becomes a clean page.

The Buffer Pool Extensions itself are only used if the Buffer Pool of SQL Server get’s into memory pressure. Memory pressure means that SQL Server needs more memory than currently available. In that case the Buffer evicts pages from the Buffer Pool, which were least recently used. SQL Server uses here a Least Recently Used Policy (LRU). If you have now configured an Extension File, then SQL Server will write these pages into it, instead of writing them directly out to our slow storage. If the page is a dirty one, then the page will be also concurrently written to the physical storage (through an asynchronous I/O operation). Therefore you can’t loose any data when you are dealing with the Buffer Pool Extensions. At some point in time your Extension File will be also completely full. In that case SQL Server has to evict older pages from the Extension File (again through a LRU policy), and finally writes them to the physical storage. The Extension File just acts as an additional layer between the Buffer Pool and the storage itself.
Let’s have now a look on how we can configure the Buffer Pool Extensions in SQL Server 2014. SQL Server offers you here the command ALTER SERVER CONFIGURATION SET BUFFER POOL EXTENSION. Let’s have a more detailed look on how you use it:

ALTER SERVER CONFIGURATION
SET BUFFER POOL EXTENSION ON
(
   FILENAME = 'd:\ExtensionFile.BPE',
   SIZE = 15 GB
)
GO


The first restriction that you are hitting here is the fact that the Extension File must have at least the same size as the Buffer Pool itself. If you are specifying a smaller file size, you will get a lovely error message from SQL Server:

Msg 868, Level 16, State 1, Line 1
Buffer pool extension size must be larger than the current memory allocation threshold 1596 MB. Buffer pool extension is not enabled.


The next restriction that you will definitely hit is that you can’t change the size of the Extension File during the runtime of SQL Server. For example, when you want to change the Extension File to a larger size, you have to disable the Buffer Pool Extensions, and re-enable them again. You will have of course a performance degradation in the time of this operation, because you are just disabling one important caching layer used by SQL Server.

And in addition you are also not able to reduce the size of the Extension File, the file must be always larger than previously. Otherwise you are again getting an error message:

Msg 868, Level 16, State 1, Line 3
Buffer pool extension size must be larger than the current memory allocation threshold 4096 MB. Buffer pool extension is not enabled.


The whole configuration of the Buffer Pool Extensions can be also retrieved through the Dynamic Management View sys.dm_os_buffer_pool_extension_configuration.


Friday, April 4, 2014

Finding Last Backup Time for All Database – Last Full, Differential and Log Backup

SET NOCOUNT ON
GO
SET quoted_identifier OFF
DECLARE @dbname AS VARCHAR(80)
DECLARE @msgdb AS VARCHAR(100)
DECLARE @dbbkpname AS VARCHAR(80)
DECLARE @dypart1 AS VARCHAR(2)
DECLARE @dypart2 AS VARCHAR(3)
DECLARE @dypart3 AS VARCHAR(4)
DECLARE @currentdate AS VARCHAR(10)
DECLARE @server_name AS VARCHAR(30)
SELECT @server_name = @@servername
SELECT @dypart1 = DATEPART(dd,GETDATE())
SELECT @dypart2 = DATENAME(mm,GETDATE())
SELECT @dypart3 = DATEPART(yy,GETDATE())
SELECT @currentdate= @dypart1 + @dypart2 + @dypart3
PRINT "#####################################################################"
PRINT "# SERVERNAME : "+ @server_name + " DATE : "+ @currentdate +"#"
PRINT "#####################################################################"
PRINT "DatabaseName Full Diff TranLog"
PRINT "##########################################################################################################################################"
SELECT SUBSTRING(s.name,1,50) AS 'DATABASE Name',
b.backup_start_date AS 'Full DB Backup Status',
c.backup_start_date AS 'Differential DB Backup Status',
d.backup_start_date AS 'Transaction Log Backup Status'
FROM MASTER..sysdatabases s
LEFT OUTER JOIN msdb..backupset b
ON s.name = b.database_name
AND b.backup_start_date =
(SELECT MAX(backup_start_date)AS 'Full DB Backup Status'
FROM msdb..backupset
WHERE database_name = b.database_name
AND TYPE = 'D') -- full database backups only, not log backups
LEFT OUTER JOIN msdb..backupset c
ON s.name = c.database_name
AND c.backup_start_date =
(SELECT MAX(backup_start_date)'Differential DB Backup Status'
FROM msdb..backupset
WHERE database_name = c.database_name
AND TYPE = 'I')
LEFT OUTER JOIN msdb..backupset d
ON s.name = d.database_name
AND d.backup_start_date =
(SELECT MAX(backup_start_date)'Transaction Log Backup Status'
FROM msdb..backupset
WHERE database_name = d.database_name
AND TYPE = 'L')
WHERE s.name <>'tempdb'
ORDER BY s.name

Wednesday, January 22, 2014

Contained Databases in SQL Server 2012

Contained Databases in SQL Server 2012


Contained
databases are a new feature in SQL Server 2012 and are defined on MSDN Library as ”a database that is isolated from other databases and from the instance of SQL Server that hosts the database”.

The
containment setting of a database can be NONE, PARTIAL or FULL. But only NONE and PARTIAL are supported on SQL Server 2012.

There
are three types of containment hinted at in SQL Server 2012:
  • NONE: This default containment mode is what exists prior to SQL Server 2012. There are no boundaries defined or visible.
  • PARTIAL: With partially contained databases, you have the ability to define clearer boundaries between databases and the server, making it easier for metadata to be hosted within the databases. This, in turn, makes SQL Server databases more portable and less dependent on underlying hosts.
  • FULL: Fully contained databases are only alluded to in SQL Server 2012 BOL in a few locations and aren't currently available as an option. It's assumed, however, that full containment will enable greater database portability and potentially allow for strict enforcement of containment boundaries as a means of fully isolating databases from each other and from the underlying host.

Benefits and characteristics.


The
following are some of the benefits and characteristics that contained databases have:

1.
They make easier to migrate databases from one server to another. Errors related to orphan users are no longer an issue with contained databases, since a contained database user can now be created without an associated login.

2.
Authentication can now occur at the database level.

3.
Contained database users can be Windows and SQL Server authentication users.

4.
A contained database user can access only contained database objects. They cannot access system databases and cannot access server objects.

5.
Metadata is stored on the contained database and not stored on system databases. This makes contained databases more portable than the databases we know.

 
Disadvantages and limitations.


Some
disadvantages and limitations are the following:

1.
There are some security concerns. A database owner can create contained database users without the permission of a DBA. The possibility of denial of service attacks exist with contained databases using AUTO_CLOSE option. For security best practices about contained databases, please see the references shown at the end of the article.2. Partially contained databases cannot use replication, change data capture, change tracking, numbered procedures, schema-bound objects that depend on built-in functions with collation changes. You may find more limitations on the references shown at the end of this article.Requirements of contained databases.
1 It is required to enable contained databases on the instance.2. The contained database needs to be added to the connection string or specified when connecting via SQL Server Management Studio.Step-by-step instructions on how to create a contained database.

To
be able to create contained databases on a SQL Server 2012 instance, we need to enable the contained database authentication option on the instance.

Open
SQL Server 2012 Management Studio, connect to the instance, make a right click on the name of the instance on Object Explorer, select the Advanced page on the "Select a page" panel, and set to true the "Enable Contained Databases" option.

Alternatively,
you can use sp_configure system stored procedure to enable contained databases on the instance, as shown below.
EXEC sp_configure 'show advanced', 1
GO
RECONFIGURE
GO
EXEC sp_configure 'contained database authentication', 1GO
RECONFIGURE
GO


When
a database is created the "Containment type" should be set to "partial" to make the database a contained database, as shown below.

This
can be done using T-SQL too, as shown below.


A
contained database allows the creation of a database user that is not associated to an instance login. A contained database user can be created expanding the Security folder on the contained database, making a right click on the Users folder and selecting the "New User" option.


Next,
set the user type to "SQL user with password", assign a user name, set the password for the database user and specify the default schema for the user.


Specify
the roles for this user on the database and click OK.


If
you would like to create the contained database user using T-SQL, please see the example below.CREATE USER [MorilloCD2User]
    WITH PASSWORD=N'p@ssw0rd123',
   
DEFAULT_SCHEMA=[dbo]GO


To
connect a contained database user to a contained database, the database name should be specified on the connection string. If you are using SQL Server Management Studio, on the Connect to Server dialog specify the authentication, specify the user name, provide the password, click on the Options button and specify the database name on the "Connect to database" combo box.